Uncategorized

Pelican Hard Drive Case

I've alluded in previous posts to moving hard drives offsite as a secondary backup technique.  Buying more hard drives and storing them offsite as a secondary backup is kind of a pain in the butt (so is buying more hard drives).  Having survived one house fire, I can tell you that you can never have too many backups.  I was fortunate in that my data was ok following the fire.  Had the firefighters not gotten there as quickly as they did, I could have lost my entire photo catalog.  Every. Picture.  You get the idea.  I've decided now to keep backups in multiple physical locations now.  One backup in my apartment, one backup at work.  Hard disk drives don't particularly hold up well with a lots of transport (I just had one WD Passport fail on me as a result) so I wanted to find a good case for the transport of drives.  For the moment, I settled on a Pelican 1300 case.  Here are the specs (directly from manufacturer website):

1300 Case
Interior Dimensions:
9.17" x 7.00" x 6.12" (23.3 x 17.8 x 15.5 cm)
  • Watertight, crushproof, and dust proof
  • Easy open Double Throw latches
  • Open cell core with solid wall design - strong, light weight
  • O-ring seal
  • Automatic Pressure Equalization Valve
  • Stainless steel hardware
  • Pick N Pluck™ with convoluted lid foam
  • Lifetime Guarantee of Excellence

With the Pick N Pluck foam, I've configured mine to hold 4 3.5" drives.  There are many other ways this can be configured but this is what I settled on.  A couple thoughts about the Pick N Pluck foam: it seems to leave a little foam residue (dust) behind and the foam itself seems to be rather static-y.  For these reasons, I plan to put my drives in a sealed static-free bag before putting them in the case.  Otherwise, this case seems to be perfect for my needs.  

I bought my case here.

Typical disclosure: I'm not endorsed by Pelican nor Amazon and received no compensation for this post.  Case was purchased by me personally.  

Thunderbolt Bridge and Target Disk Mode

One of the problems with working with multiple computers is sharing data between them.  With the purchase of my 2013 Mac Pro, I've realized that it's relatively easy to transfer information between two thunderbolt-capable Macs.  First connect the two with a thunderbolt cable.  Next, start the computer from which you want to transfer in "target disk mode".  Hit the power button and hold down the "T" key.  This will start the computer in target disk mode.  The computer which you want to transfer files to should then see this computer as a hard drive and you will have access to all the files.  File transfer can then be done over thunderbolt very quickly.  Pretty awesome.  

Music Recording Backup Scheme

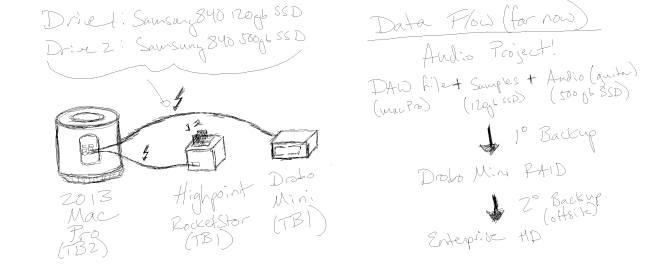
Sooooo because I'm a nerd and I invested a lot into the current workstation setup I've got, I decided to outline some data backup schemes that I have.  Mainly for my own use to provide a cloud-based schematic for how I have my system setup but others may benefit as well.  I also have a Wacom Cintiq 13HD that I need to start learning how to use, so that was the other motivation behind the underlying pics.  Here goes... For music recording I'm using the DAW (digital audio workstation) Logic Pro X.  I like it because it's relatively simple and comes with a bunch of software instruments and royalty free loops that are ready to go.  It also integrates seamlessly with the Apogee hardware I like to use (for now a Duet 2).  My recording projects involve a project file which is based off my 2013 Mac Pro hard drive (a pcie-based SSD), a samples drive (where my drum samples of BFD 3.0 live...a Samsung 840 120GB SSD connected via thunderbolt with a HighPoint RocketStor thunderbolt dock), and an audio drive (where my guitar/bass/vocal/mic recordings go...a 500GB Samsung 840 SSD plugged in to the second slot of the HighPoint).  My projects are then backed up to a Drobo Mini using the Carbon Copy Cloner program and will then be backed up to another drive to be stored offsite (said drive still needs purchasing).

Here's the data flow...only thing missing is the Duet which I use to get audio information in to Logic

Image